Have you thought about that name? I really do have a better life because I scrapbook. How about you?
It was my turn to do a tutorial using our beautiful cardstock from Discount Cardstock. I am going to teach you how to make flowers from scraps! I have seen a number of these tutorials come out on the internet, but can I tell you a secret? I have been making these flowers for about 3 years! Ever since I was taught how to fringe cardstock at a CTMH convention, I kept thinking up ways to use that fringe. Really, just play sometimes in your craft room and you will find many ways to use things! Anyway, on to the tutorial ~
Let’s get started with the paper you need for this flower:
I’m starting with two different colors – Eggplant Felt and Kraft. I want to layer my colors so I’ve chosen to use two different cardstocks. The dimensions are Eggplant Felt – 1-1/2″ x 12″, Kraft – 2″ x 12″, and Eggplant Felt – 2-1/2″ x 12″. So you see, I added 1/2″ for every layer. With this simple start, you can create as many layers as you want in as many different colors that you want.
Fold your pieces lengthwise. If you have a bone folder, that works best to get a nice solid crease. The next step is to make those pieces into fringe. Let me show you what it looks like when you are done:
This is a quick technique using your scissors. It doesn’t have to be perfect, you just have to make sure to leave about 1/4″ uncut at the fold. I’ve been using this fringe technique for grass, cowboy fringe, and decorative elements on my pages, cards, and gifts for years. Isn’t it fun to turn it into a flower? When you are done cutting the fringe, leave your pieces folded in half. If you like a little distressing, go ahead at this point and add some ink. I love the worn look to my flowers!
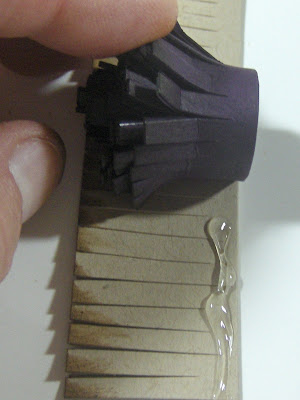
Now you are going to start creating your flower, working with the narrowest piece first. I use a high temp glue gun at this point, but glue dots or strong double-sided adhesive will work, too. Put some adhesive near the fold of your cardstock, as I have shown, and start rolling it up until you reach the end:
At that point you are ready to add the next piece:
When you are done, this is what you will have:
Start fanning out the fringe:
And this is what you will end up with:
At this point, you can distress your “petals” some more. You will notice how strong and durable they are!
You can use this flower for just about anything. It is a lovely embellishment for your creations! This is strong enough that it would make a lovely pin as a gift. Just pick up a pin back at your local craft store, and attach it to the back with your glue gun. I’ve chosen to add mine to a Halloween treat bag for one of my friends. You can use an bag pattern to make one out of cardstock and then embellish as you like!
Let me know in the comments if you decide to make one of these. The Better Scrap team would love to see what your lovely work!!
Items used: Bazzill Eggplant and Kraft Cardstock (Discount Cardstock); Hallowe’en in Wonderland (Graphic 45); Black Grosgrain and Lace (Paper Source); Vintage Photo Distress Ink and Applicator Tool (Ranger Ink)
Subscribe to:
Post Comments (Atom)
New Book, New Look!
Sometimes it just that time to make a change. I've had this blog you are visiting for 12 years! Wow, that's a lot of post and a lo...
-
This is a fun, easy, and beautiful workshop! All pieces will be pre-cut and sorted for you, so that you can easily record your favorit...
-
Welcome to my stop on the OWH Spring Break Bloghop! If you've arrived here from Kathy's blog, I am so glad to have you join me! If ...


8 comments:
I love it Brenda. Is it terribly bulky?
Wow, I LOVE this, what a fabulous flower!
I love this idea Brenda - the directions are so good - I know I will use this!
Brenda, this is absolutely amazing!!! I love it!!! Your tutorial was fantastic! And your treat bag is precious! I'm sure your friend is going to looooove it!!! Hugs!!
BTW I try to leave comments over on the Better Living Through Scrapbooking Blog, but I just can't seem to get the link to work to me!! :o(
Great flower and you make it look so easy!
Great idea Brenda!! Thanks for sharing. I am rushing to my craft table right now to make one!
I've made similar flowers, but I've never tried it with 3 layers! I'm going to have to try this after I rest up from September's challenges! :-) Thanks for the tutorial!
So enjoyed this tute Brenda, gorgeous, I cannot wait to try one....
Post a Comment